Pages

Thursday, January 31, 2013

How To Styling a Ballerina Bun

Steps :
  • 1 : If your hair is straight, curl the ends with a curling iron. This prevents little hairs from poking out of your bun!
  • 2 : Gather your hair into a ponytail on top of your head.
  • 3 : Pull your hair through one last time, but only half way! Take the loop you’ve created and spread it out.
  • 4 : Take the end of your ponytail and wrap it around the base of the bun.
  • 5 : Secure with bobby pins.
  • 6 : Finish with hair spray! See, that wasn’t so hard!

Wednesday, January 30, 2013

Beautiful Crimson Curls Hairstyle

Beautiful Crimson Curls Hairstyle


Tutorials You Should also see :

Tuesday, January 29, 2013

Chalked Crown Hair

Steps :
  • 1 : Starting with a side part, french braid the side with more hair. Keep the french braid against your head until you've reached the ear, then continue the braid away from the head.
  • 2 : Braid the other side in a loose braid starting at ear height (leave some hair down below the braid to hang over your ears).
  • 3 : Pull the braid across the front of your head and pin it in to the french braid so that it is secure across your forehead like a head band (tuck the ends of the braid into the french braid to make it look like one continued braid around the head).
  • 4 : Pull the french braid around the back of the head and pin it in to the opposite braid.
  • 5 : Use different colours of Kevin Murphy Color Bugs or any hair chalk to add colour to the braided crown!

Monday, January 28, 2013

Curly Hair With Paper Towels

How To :
- You basically wash and comb your hair.
- Cut the paper towel into two inch strips and roll the hair onto it like you would a curler.
- Then you pick up sections of hair, the smaller the section the more curl you will get.
- Tie the ends of the paper towel tight so it holds all night.
- Go to bed. In the morning you unwrap the hair and voila!! beautiful curls.

Sunday, January 27, 2013

How To Styling a High Chignon

Steps :
  • 1 : add some styling cream and brush hair into ponytail.
  • 2 : tie hair in to a half knot, lift up and secure with large bobby pins inside of hair.
  • 3 : leave the remaining hair & set with hair spray for hold.
  • 4 : pull pony tail on to one side and pin.
  • 5 : pin remaining hair inwards.

Saturday, January 26, 2013

Get Easy And Sexy Beach Waves

How To Style :
  • Step 1 : Start with slightly damp or naturally dried hair. Then Divide the hair into three sections: One on top, two on the bottom. Pin up the top section on top of your head.
  • Step 2 : Now, in each section, start working with smaller 3-inch chunks at a time.
  • Step 3 : Spray the Ocean Mist on each sub-section, making sure not to saturate the hair. Then Gather the sprayed section in your hand in an S-shape.
  • Step 4 : Scrunch the coiled hair slightly as you heat it with a dryer.
  • Step 5 : Intensify the new wave shape where needed with a straightener, making sure to follow the direction of the wave.
  • Step 6 : Finish it off with the Medium-Hold Hairspray and some Straight and Shine Spray on top to give the look gloss.
Tutorials You Should also see :

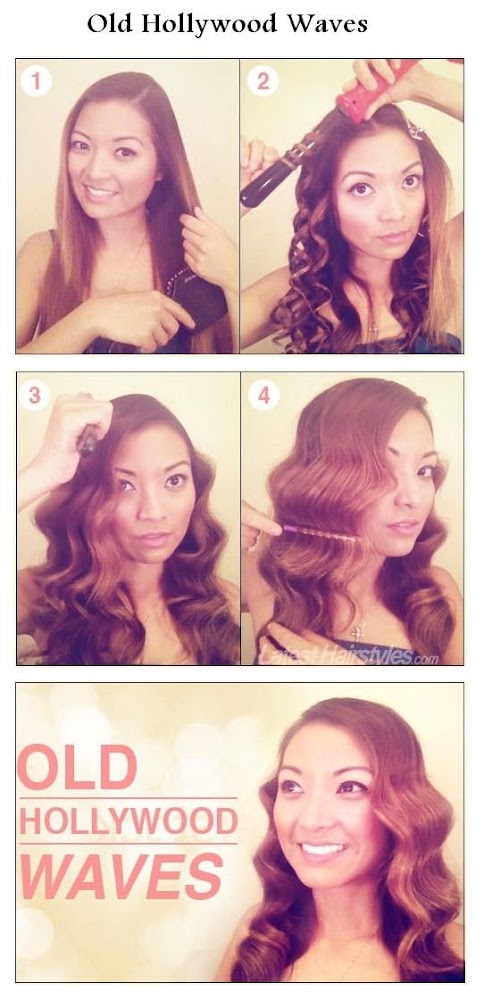
Make an Old Hollywood Waves For Your Hair

Steps :
  • 1 : Begin with dry hair parted to the side. Prep hair with a thermal protectant like Hot Off The Press by Paul Mitchell.
  • 2 : Curl all of your hair in one direction using a one-inch curling wand. The side with the heavier part will curl towards your face and the other side will curl away from your face. Uniform curls are key to this style! The size of your sections and the way your curl each one should be consistent.
  • 3 : Brush through your curls when they have cooled with a boar bristle brush to make them blend together and form a wave .
  • 4 : With a comb right under each wave ridge, comb upwards to make the ridge more prominent.
  • 5 : Set with your favorite hairspray.

Wednesday, January 23, 2013

Make a Roll and Twist Side Ponytail

How To Style :
  • Step 1 : Spray some texturizer into your hair to give it hold. Next, grab a section of hair from the front left (or right) side of your head and pull it across the back of your head. Secure in place with a bobby pin.
  • Step 2 : Take a piece of hair from the base of your neck and tuck it over the first piece of hair. Secure with another pin.
  • Step 3 : Continue to take pieces from the base of your neck and tuck them into the roll. Continue using pins to ensure a good hold.
  • Step 4 : Once you’ve reached the opposite side of your head, pull the majority of your hair into a ponytail right by your ear and tie with an elastic.
  • Step 5 : Take the remaining free section and pull it next to your ear and underneath the base of the pony. Wrap it over the top and around again until there’s virtually no hair left.
  • Step 6 : Secure the remaining end of the loose strand under the pony with a bobby pin to keep it hidden.
Tutorials You Should also see :

Beautiful Big Ballerina Bun

Beautiful Big Ballerina Bun


Tutorials You Should also see :

Monday, January 21, 2013

4 Different Crown Braid For Hair

4 Different Crown Braid For Hair


Tutorials You Should also see :

Sunday, January 20, 2013

How To Use Clipless Curling Iron

How To Style :
  • Step 1 : Add some styling cream onto wet hair & blow dry.
  • Step 2 : Use enzo milano wand to curl hair.
  • Step 3 : Start at the base and wrap hair around wand.
  • Step 4 : Leave ends straight.
  • Step 5 : Finger comb hair.
  • Step 6 : Use dry shampoo for texture.

4 Beautiful Curly Hair With Braid

4 Beautiful Curly Hair With Braid


Tutorials You Should also see :

Saturday, January 19, 2013

Make a Fishtail Bun For Your Self

Steps : 
Step One: Put hair into a loose ponytail. Make sure that they ponytail is high up.
Step Two. Start to fishtail, and make sure that the fishtail is loose. Fishtail all the way down, and make then end section of the hair tight.
Step Three: Pull on the fishtail, spreading it further out. (This makes the hair look thicker)
Step Four: Once the hair is pulled loose wrap the hair around in a bun. Make sure that the end section of the fishtail is at the top of the bun.
Step Five: Use pins to keep the bun in place, use hair spray then pull on the bun making it fuller.


Tutorials You Should also see :

4 Different Sided Ponytail Hairstyle

4 Different Sided Ponytail Hairstyle


Tutorials You Should also see :

Friday, January 18, 2013

Tucked Side Ponytail Hairstyle

How To Style :
  • Step 1 : Fit your hair extensions a little higher up than normal, then pull all of your hair over one shoulder and secure into a side ponytail with your bobble/elastic.
  • Step 2 : Once you have secured your ponytail tightly, you need to hold your bobble/elastic and pull this about 2” down the ponytail.
  • Step 3 : Using your hands, you now need to part the small section of hair above the bobble/elastic. Once you have parted the hair enough to have a clear gap, push the elastic up and into the hole! Now you have to make sure you pull all your hair through.
  • Step 4 : To finish off this tucked side pony hair tutorial, you simply need to pull the ends of your hair tightly which will push all the hair together neatly at the top of your pony. If your hair is a little shorter you may need a few bobby pins here to just tidy up the tuck.

Thursday, January 17, 2013

Make a Curly Hair With Volume

Steps :
1 : Section hair into a vertical section in front of the ear.
2 : Spray section with hair spray. Holding the curling iron clamp with your index finger (we prefer a 1.25-inch Hot Tools curling iron), clamp the section mid-shaft.
3 : Reach your opposite hand over to grab the rubber top of your iron, and immediately curl upward.
4 : Slightly loosen clamp grip on hair, and inch the curling iron downward. Then burl upward again. Repeat down the length of your hair section.
5 : Loosen clamp grip and release. Spray.
6 : Repeat steps 1 to 5 going around the head.
7 : Run fingers through your hair to break up the curls.
8 : Section hair into small sections around the crown.
9 : Wrap hair around the barrel of the curling iron (with clamp down). Repeat around the entire crown. Spray hair all over.


Tutorials You Should also see :

Wednesday, January 16, 2013

Make a French-Style Side Braid

Steps :
  • 1 : Start by separating a small section of hair from the bottom of the sweep of hair going across the back of your neck.
  • 2 : Split this section of hair into three sections and begin braiding as usual. Grab one of the outer sections and cross it over to the middle, then grab the outer section on the opposite side and pull it to the middle.
  • 3 : Continue braiding, add a section of loose hair from the hair sweeping over your other shoulder before you move it to the middle. By the time the (once-small) braid reaches the opposite side of your head, it should contain all your hair, not just the little section.
  • 4 : When you reach the opposite ear, braid the rest of your hair like a normal braid.
  • 5 : Secure the end of the braid with an elastic band, arrange any wisps of hair that are hanging out, and spray with hair spray if desired.

How To Get The Perfect Blowout at Home

How To Style :
  • Step 1 : Using a round brush, dry your hair and make sure it’s completely dry.
  • Step 2 : Twist your hand in a spiral motion when releasing hair from the round brush. You’ll end up with a pretty, spiral wave. Continue until your hair is completely dry.
  • Step 3 : Using either a 1-inch curling iron or wand, wrap 1-2 inch sections of your hair around the iron. Don’t do a spiral wrap; hold the iron so it is perpendicular to your head. This will create a relaxed waved that doesn’t start right at the root.
  • Step 4 : Lift a few sections at the crown of your head and tease for some volume. Do this in layers so you don’t end up with a “rat’s nest” effect. Don’t forget to smooth out the top!
  • Step 5 : Finish with a great hairspray. You can loosen your curls a bit more by running your fingers through it.

Monday, January 14, 2013

How To Style a Baby Bouffant Hairstyle

How To Style :
  • Step 1 : Take a section of hair from the arch of each eyebrow, to the top of your crown.
  • Step 2 : In 1/2-inch deep parts of that section, use an up-do comb and tease the hair, back-combing the hair half-way down its length to create a little pillow.
  • Step 3 : After you have the perfect rat's nest, drop it into the rest of the hair, slightly brushing the top of the newly volumized area so it looks smooth.
  • Step 4 : Starting an inch above each temple, pull back two 2-inch sections of hair for a half-up look.
  • Step 5 : One option is to pull the two pieces back, then turn the pony in towards the head for an easy flip-over look.
  • Step 6 : Another more advanced option is to pull the two pieces back and finish the look with a sweet fish-tail braid.
  • Step 7 : For extra texture, pull the pieces of the braid apart to make it a bit fatter.

Make A Half Up Half Down For Your Hair

How To Style :
  • Step 1 : Start with loose waves in your hair.
  • Step 2 : Backcomb or tease the hair at the crown of your head.
  • Step 3 : Smooth out the top layer.
  • Step 4 : Twist one side of your hair and pin it about 2/3 of the way across your head (this is the big trick that will allow you to hide your tracks!)
  • Step 5 : Now twist the other side and tuck it under the first part.
  • Step 6 : Again, pin that piece about 2/3 of the way across your head.