 |
Showing posts with label Braid Hair. Show all posts
Showing posts with label Braid Hair. Show all posts
Saturday, April 6, 2013

Wednesday, April 3, 2013

Saturday, March 30, 2013
How To Make Braided Bun Prom Hairstyle at Home
 |
- Step 1 : Brush through the whole of your hair using your hair brush. Then use your styling comb to backcomb the top section of your hair, Smooth over using your hair brush and tie back into a high ponytail.
- Step 2 : Now it’s time to split the ponytail into two separate sections to start your prom hairstyle, making sure they are equal in size. Tie one section of the hair with a thin hair band to keep it out of the way.
- Step 3 : Braid right down to the ends of the hair section and secure with a thin hair band. Repeat this step with the other section of hair.
- Step 4 : Now you need to criss-cross the braids, so take the right braid under the left braid and wrap around the base of the bun as far as you can go, then secure in place with a bobby pin.
- Step 5 : Now take the left braid and wrap it around the base of the bun, starting from the right side. Secure in place with a bobby pin, repeating the above step, Finish off by spritzing some hairspray all over to hold in place.
Wednesday, March 13, 2013
Fishtail Braid Updo hair Tutorial 2013
 |
- Step 1 : Gathering your hair to the side and secure it with a thin rubber hair tie. Divide it into two sections.
- Step 2 : Hold both sections in one hand, separated by your pointer finger, and use your other hand to grab a small piece from the outside of one section.
- Step 3 & 4 : Repeat step 2 until you’ve just about reached the end and secure it with an elastic. It’s even better if it’s messy, so pull out some strands and roughen up the braid a bit.
- Step 5 : If you want to turn your fishtail into an updo, start by rolling the braid inward and up towards the nape of your neck.
- Step 6 : Secure the rolled bun with bobby pins. The looser and messier the bun, the better!
Tuesday, March 12, 2013
How To Make Elegant Crown Braid for Women
 |
- Step 1 : First hand-dry the hair with Surf Spray and then White Hair Powder to give it a roughed-up texture with lots of grip.
- Step 2 : Create an exaggerated side part, then back-comb crown for a bit to added volume.
- Step 3 : Isolate a large section of hair on the thick side of the part and braid into a traditional three-strand braid all the way down to the ends. Use a clear elastic to secure. Use fingers to gently pull braid apart so it’s wider. Rub braid with palm of hand to create a little bit of fuzziness.
- Step 4 : Pull The hair into a ponytail by the nape of the neck, securing with a bungee hair-tie. Keep ponytail slightly loose to preserve volume. Back-comb length of ponytail for added fullness.
- Step 5 : Tuck the tail of the braid into the chignon, securing with a bobby pin.
- Step 6 : Fine-tune the hair with fingers and use hairspray all over the hair to set.
Thursday, February 28, 2013
Make a Boho Braided Side Bun for Long Hair
 |
- Step 1 : Part your hair asymmetrically, and begin French braiding from the temple of the side of your head with less hair to directly beneath your ear on the opposite side.
- Step 2 : Continue braiding down like normal for an inch or two, and then tie off the end with a clear elastic hair tie.
- Step 3 : Using a curling iron, wrap the rest of your hair away from your face to create loose, summery beach waves.
- Step 4 : To balance out your French braid, grab a few random pieces from the opposite side of your head and do a loose twist.
- Step 5 : Join the French braid and twist together to fashion a very organic, boho chic side bun.
- Step 6 : Secure your bun with several bobby pins, and to add a bit of texture, spray your updo with Hairspray. et Voila!
Sunday, February 24, 2013

Saturday, February 23, 2013
How to make Double Side Braid For Hair
 |
- Begin with your hair down.
- Take a section of your hair from the thicker side of your part.
- Then braid it all the way down. It will lie flat on your head best if you angle it back as you're braiding it.
- Next, using a technique Elsie and Sarah taught me here, slightly tug all along the braid, making it appear thicker.
- Once the braid is complete, pin it on the back/far side of your head underneath the top layer of your hair, covering the bobby pins.
- Next, braid the rest of your hair into a side braid.
- Continue with the same process as the first braid, slightly tugging along the whole thing.
- If it
Source : Double Braid Hair Tutorial
Tutorials You Should also see :
Friday, February 22, 2013
Make a beautiful braid for your hair

Thursday, February 21, 2013
Make a Medieval Braid For Your Hair

Monday, February 18, 2013
How to make half braid for your hair

Sunday, February 17, 2013
Get Your Own Hairdressing Home Tutorials For Life!
 |
Are you looking for an easy way to learn hairdressing and styling?
If you're ready to discover the secret techniques to dressing and styling hair, no matter if you're a beginner or a professional and without paying expensive prices for personalized tutoring, then I've got just what you need.
Tutorials You Should also see :
Friday, February 15, 2013
How To Style a Fishtail Braid
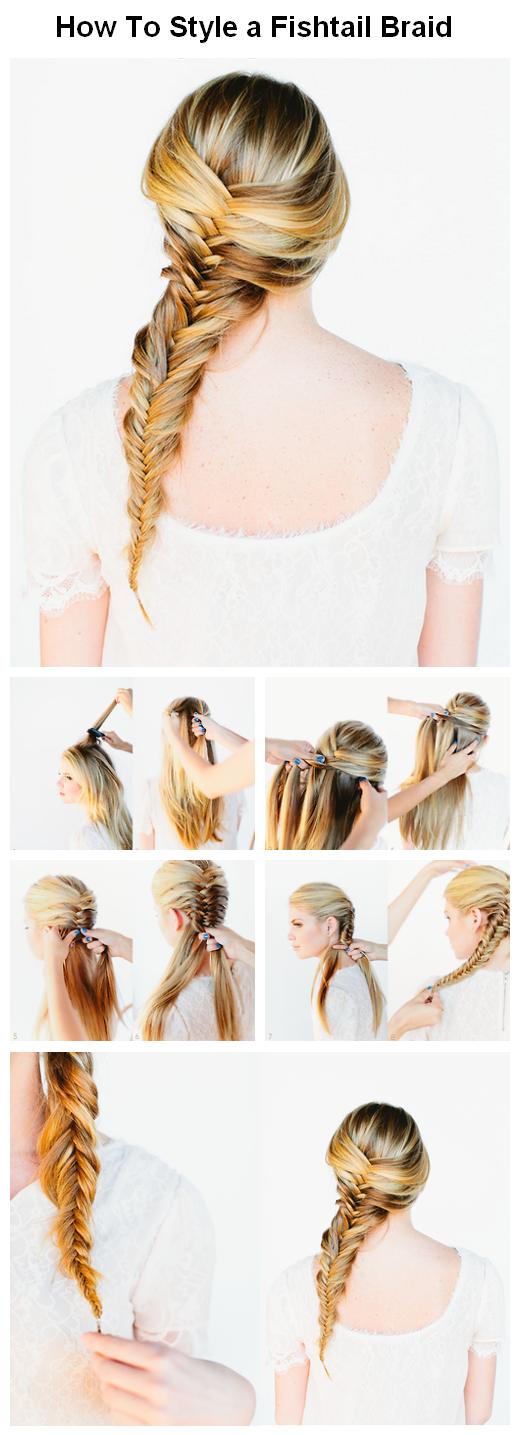 |
1. Backcomb/tease the crown of your head. This makes the hair “sticky” for starting the fishtail.
2. Gather a small handful of hair from the back center of the head and separate the hair into two sections.
3. + 4. Take a small strand of hair from the right section, pull it back and cross it over to join the left hair section.
5. + 6. Take a small strand of hair from the left section, pull it back and cross it over to join the right hair section.
7. Repeat these steps all the way down the back of the head. Continue throughout the “tail”.
8. Secure with hair tie. Fishtails looks beautiful a little disheveled. To achieve this look gently pull apart/loosen the braid. It’s ok if it’s uneven or little pieces falls out. Gives the fishtail a youthful, messy ease.
Tutorials You Should also see :
Thursday, February 14, 2013
How To Make a Fishtail Braid
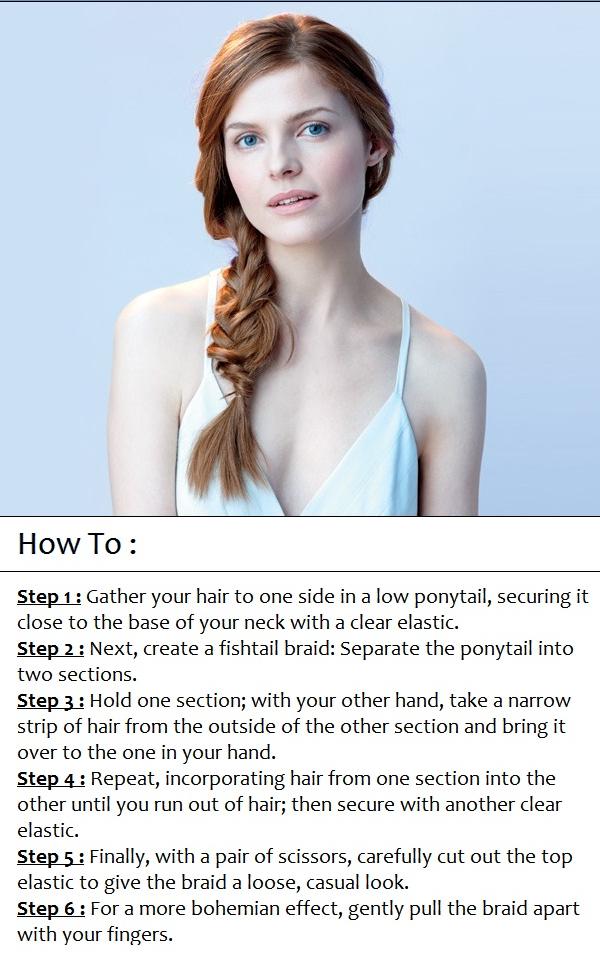 |
- 1 : Gather your hair to one side in a low ponytail, securing it close to the base of your neck with a clear elastic.
- 2 : Next, create a fishtail braid: Separate the ponytail into two sections.
- 3 : Hold one section; with your other hand, take a narrow strip of hair from the outside of the other section and bring it over to the one in your hand.
- 4 : Repeat, incorporating hair from one section into the other until you run out of hair; then secure with another clear elastic.
- 5 : Finally, with a pair of scissors, carefully cut out the top elastic to give the braid a loose, casual look.
- 6 : For a more bohemian effect, gently pull the braid apart with your fingers.
Tutorials You Should also see :
Sunday, February 10, 2013
4 Beautiful French Braid Hairstyles

Saturday, February 9, 2013
How To Make French fishtail braid chignon
 |
Source : Steps For This Tutorial
Tutorials You Should also see :
- How To Make a Summer Hair Bun
- How To Make a Whimsical Waves
- How To Make a Braided Bun
- Make a Braided Crown For Your Hair
- How To Make Little Fishtails For Your Hair
Tuesday, February 5, 2013
How To Make a Braided Bun
 |
- Step 1 : brush your hair. then make a braid on one or both sides. These can be as big or small as you want.
- Step 2 : Tease the back part of your hair slightly to create a bit of a poof on the top of your head.
- Step 3 : Pull the braids to the side and pin them at the back of your head (at ear hight) with a bobby pin in the same color as your hair.
- Step 4 : Grab all your hair now and make a high, slightly messy ponytail. Pin away any loose ends at the back of your neck.
- Step 5 : Braid the ponytail. If you braid it tightly the structure will show best once it's wrapped in to a bun.
- Step 6 : Start rolling the braid around the ponytails hair elastic and set the end with two bobby pins or with another elastic (in that case pull some of the bun over it, to cover it).
Tutorials You Should also see :
Monday, February 4, 2013
Make a Braided Crown For Your Hair
 |
- Brush your hair.
- Take the top part of your hair and twist the end, like in the picture.
- Push the twisted part a bit up against your head to get more volume at the top, secure with bobby pins.
- Divide the rest of your hair in two parts.
- Braid one of the parts and temporarily apply a bobby pin at the end.
- Braid the other half of your hair, and look a bit like Pippi Longstocking ;)
- Take both the braids and fold them over your head. Twist them around each other at the part where the braids meet.
- Secure the braids with bobby pins.
Tutorials You Should also see :
Tuesday, January 29, 2013
Chalked Crown Hair
 |
- 1 : Starting with a side part, french braid the side with more hair. Keep the french braid against your head until you've reached the ear, then continue the braid away from the head.
- 2 : Braid the other side in a loose braid starting at ear height (leave some hair down below the braid to hang over your ears).
- 3 : Pull the braid across the front of your head and pin it in to the french braid so that it is secure across your forehead like a head band (tuck the ends of the braid into the french braid to make it look like one continued braid around the head).
- 4 : Pull the french braid around the back of the head and pin it in to the opposite braid.
- 5 : Use different colours of Kevin Murphy Color Bugs or any hair chalk to add colour to the braided crown!
Tutorials You Should also see :
